Preparing Art for Printing
 In a world that is often focused on displaying text and graphics on a computer screen or phone, it’s good to remember that printing on paper has different requirements. This column will offer tips on how to get consistent, high-quality results in your print projects.
The title of this article is taken from “Preparing Art for Printing,” a course offered at The New School. As a student at Rutgers University in 1971, I developed an interest in graphics and printing and wanted to improve my skills. Once per week, I boarded a bus for the trip into Manhattan for the evening class plus field trips to trade plants.
The instructor, an ad agency art director, explained how our class (mostly ad agency and publishing staff) should interact with print suppliers. At that time, all print processes were completed by specialist trades: typesetters, photo engravers, offset printers. For example, if a project required typesetting, you would draw a layout, count the text to determine the correct size and leading, mark up the manuscript with these instructions, and call for a messenger to pick it up. The typewritten text and layout went to the typesetter in the afternoon with galleys of type returned the next morning.
Now, almost 50 years later, technology has compressed many print processes into a desktop computer, and many specialist skills are encoded in software. But some technical and quality responsibilities have shifted to project originators. This column will help you improve the quality and predictability of the final product and reduce its cost by learning print procedures.
At Windward, we work with you to provide the best results on paper.
Improve Your Printed Photos
Digital photography has made it much easier to include photos in any project. Here are a few tips to get the best results:
- For offset or digital printing, photo resolution should be at least 300 dpi at final size. Set your camera to record at its highest resolution. This will yield large files but they will have enough detail to look sharp in your print project.
- Check the focus. Even if your camera has autofocus, check that your subject is sharp on the camera screen.
- Use a tripod or camera stand. This prevents blurred images, especially in low light.
- For product shots, be sure the subject is brightly and evenly illuminated.
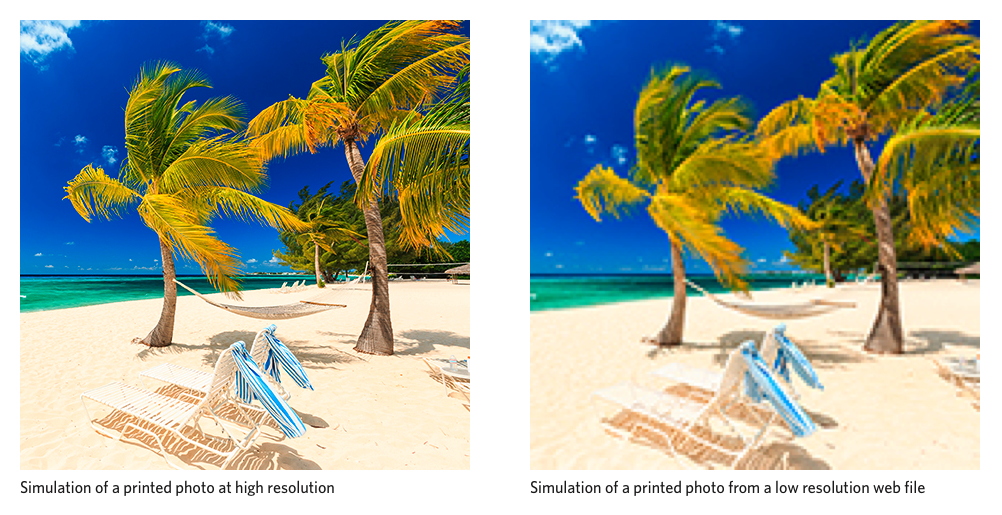
Do not use photos or graphics you find on the web. First, many are copyrighted and it is illegal to appropriate another person’s intellectual property. Second, web graphics are always at 72 dpi, too little resolution to look sharp when printed.
If you are working on a project that will appear both on line and in print, start with high resolution graphics. You can always create a version at lower resolution (downsample) for the web.
Below is a comparison between printing high- and low-resolution photos: